Swift 2.0 and the Public Sector

Introduction

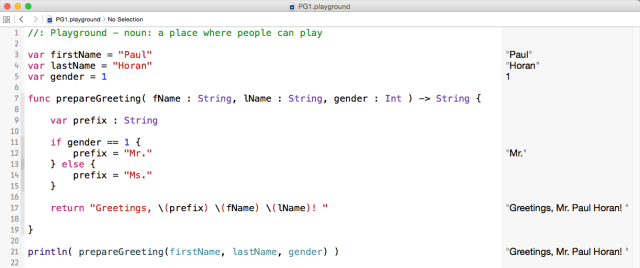
Apple introduced their new Swift programming language at their World Wide Developer Conference back in 2014.  Swift is a native language for Apple’s Cocoa and Cocoa Touch frameworks, on which the OS/X and iOS operating systems are built.  During its introduction, Apple VP Craig Federighi described Swift as “Objective-C without the C”, but it’s clear that Apple’s intentions for the language extended far beyond a simple syntax upgrade. Initial benchmarks showed significant performance improvements over both Objective-C and Python. Swift introduced several features designed to improve overall code safety, including automatic memory management, overflow checking for arrays and integers, and forced initialization of variables. The Xcode IDE also included a really nice feature called a “playground”, which was an interactive Swift programming scratch pad that evaluates code snippets in real-time, allowing the developer to experiment with algorithms, explore system APIs, and prototype sections of their applications.

To recap: the benefits of Swift as a language are:

  1. Simple to learn – less cluttered and much more approachable than Objective-C.
  2. Language features designed to increase code safety
  3. Compiled into byte code, not evaluated at runtime like scripting languages (JavaScript, Python, etc).  This can result in faster app execution.
  4. The “playground” feature of the Xcode IDE helps speed the development process by allowing quick experimentation and feedback.

Developers targeting the respective Apple platforms were generally excited by the promise of Swift as the successor to the obtuse Objective-C language, but it held no real relevance for the vast majority of developers working on other platforms. In fact, the reaction from the cross-platform community was one of general disappointment that Apple had chosen to develop a proprietary language, instead of moving in a more open direction.

SWIFT 2.0

At WWDC ’15, Apple announced Swift 2.0, which contained a number of nice enhancements to both the language and the debugger. The Swift 2.0 developer tools would also be offered on Linux, representing the first step in supporting development on non-Apple platforms. But the larger and more pertinent announcement was that the entire Swift platform was being open-sourced. But what exactly does it mean to “open source” a language? What components are involved, and what does this mean for developers in the Federal government?

  1. The first initiative is Swift.org, the open source community portal. Come here to read blogs and documentation, exchange ideas, and see how to get started. This site also has links to download all the different source code snapshots, which are hosted on GitHub.
  2. The Swift platform (which currently exists only for Mac OS X and Linux) will consist of all the tools that a fully-formed software language needs:
    • a compiler and build tools for each supported platform;
    • testing and debugging tools that will plug into 3rd-party editors and IDEs;
    • core code libraries containing the language itself;
    • and a package manager to help resolve dependencies.
  3. Licensing concerns: Swift will be licensed with a very liberal Apache 2.0 license with a runtime library exception. This means that contributors retain the copyright to their code, and the industry won’t follow Oracle’s lead with regard to the Java platform.

The ultimate goal for Swift is to have it evolve beyond the iOS and OS X platforms, and deliver on the promise of a single, secure, full-stack implementation, capable of scaling from the mobile device to the desktop to cloud services.

Open Source adoption in the Public Sector

The Federal government has traditionally been slower to embrace the OSS movement than the commercial world, and there have been significant obstacles to this adoption. The obvious concern initially was that open source software would introduce security risks. There was also huge pressure exerted by commercial software vendors who were interested only in safeguarding their revenue streams, and who fought tooth and nail to keep OSS out. And most importantly, there was a cultural shift that needed to happen before Federal agencies could fully embrace OSS.  The lines of communication between various development teams, that arguably must exist to support the level of collaboration and teamwork that OSS demands, were often completely closed, sometimes even within in the same agency.

But those obstacles are now clearly in full retreat.  Even the Dept. of Defense has recognized that OSS may actually pose fewer security risks, due to the nature of widespread public review.  Many commercial software vendors, including IBM, understand that a purely proprietary strategy is not viable in the long term, and are embracing open source platforms that complement their commercial offerings.  And lastly, the CIO of the General Services Administration published a set of “Guiding Principles” that establish an “Open Source First” policy as a key IT principle.

IBM’s Role with Apple, Swift, and Open Source

In July of 2014, IBM and Apple announced a strategic partnership to transform Enterprise Mobility.  The first fruits of that partnership have materialized as the IBM MobileFirst for iOS portfolio, consisting of over 100 enterprise mobile apps, covering 15 different industry segments.  All of these apps leverage the power of the IBM MobileFirst platform.

IBM is working diligently to extend Swift 2.0 to the server environment, initially targeting the Linux platform. In support of Swift 2.0, IBM has developed the IBM Swift Sandbox, a free service from IBM DeveloperWorks that allows you to experiment with Swift and run snippets interactively in a Linux server environment. Each Swift sandbox runs inside a Docker container in the IBM Bluemix cloud platform. You can also find a beta release of the Watson iOS SDK, all written in Swift.

Conclusion

Swift will have an enormous impact on the global IT community, and not just as a component of a mobile app development strategy.  Now that it has been open-sourced, look for Swift support to evolve across the entire spectrum of computing platforms, from mobile devices to rack-mounted server clusters.

IBM has established itself as one of the strongest supporters of the Open Source community – serving on the board of the Node.js Foundation, and contributing heavily to many open source projects such as the Apache Cordova project.  IBM stands in a unique position in the industry as the only vendor capable of providing Enterprise-level support for open source software.

Read more about all this, and interact directly with IBM engineers and evangelists at the Swift @ IBM website.

Posted in Mobility, Software, Swift | Tagged , | Comments Off on Swift 2.0 and the Public Sector

Swift for PowerBuilder Developers – Part III

Introduction

In this third installment of the series, we’ll compare and contrast the different types of Loop constructs available in both PowerScript and Swift.

If you want to start at the beginning, here are Part 1 and Part 2.

Overview

Loops are a critical part of every programming language, and all of them (at least those that I’ve worked with) do things a bit differently.

There are essentially two basic types of loops – the FOR loop and the DO loop.  They differ in one basic aspect:  the FOR loop is used when a block of code is to be executed over a specific number of iterations, and the DO loop executes a block of code until a specific condition is satisfied.  It’s really important to understand what you’re trying to achieve in the code before you select the loop syntax that you’ll be using. Trying to force everything into a FOR loop isn’t always the best approach…


FOR Loops

PowerBuilder

The basic syntax of the FOR loop in PowerBuilder is:

FOR varname = start TO end {STEP increment}
    statementblock
NEXT
  • You must declare the variable varname before you can reference it in the FOR loop.  Integer datatypes perform best, but any numeric datatype is acceptable. If you know the value of varname won’t exceed 256, use a smallint.
  • varname will be automatically incremented from start to end in increment increments. The STEP keyword is optional, and the default step size is 1, but you can use any positive or negative whole number.
  • If you need the loop to count backwards, decrementing varname from end to start, set the initial value of start to be less than end, and set the step increment to a negative number.
  • If the increment is positive, and start is greater than end at the beginning of the loop, then statementblock will NOT execute.  The same is true for negative increments – when end is less than start at the beginning of the loop.
  • The statement can also be terminated with END FOR, if you find that more readable.

Swift

In Swift, there are two variants of the FOR loop, and they operate very differently.

The loop that is most similar to PowerBuilder’s FOR loop as outlined above is actually called the FOR-IN loop.  That looks like this:

FOR varname in range-expression {
    statementblock
}
  • You don’t need to declare varname prior to its reference in the FOR statement.
  • You get automatic incrementing of varname loop counter, but that increment is always by 1.
  • You can use closed (inclusive) or half-open (exclusive) range expressions (which were covered in Part 2).

Here’s a simple example that prints out the first 10 multiples of the number 3.

for index in 1...10 {
    print( "3 times \(index) equals \(index * 3)" );
}


If you have no need to access the loop counter variable in the statement block, you don’t even need to define one!  Just use an underscore character where you would normally put the loop counter variable name.  The loop will execute the same number of iterations, you just won’t waste memory space on a loop counter.

Here’s a simple example that prints out the first 10

let base = 3;
let power = 10;
var answer = base;
for _ in 1...power  {
   answer *= base
}
print( "\(base) to the power of \(power) is \(answer) );

There’s a variant of the FOR-IN loop that automatically iterates over arrays and dictionaries (which we haven’t covered yet, but aren’t really that difficult).

Here’s an example of that style:

let primeNumbers = [2, 3, 5, 7, 11, 13, 17, 19];
for number in primeNumbers {
   print( "\(number) is a prime number") ;
}

Notice that there is no loop counter variable used or declared, and no range expression is defined.  There’s also no need to write code that checks for overflow of the array boundary.  The loop will stop automatically after the final entry in the array is processed.

The other variant of the FOR loop in Swift is actually more comparable to PowerBuilder’s WHILE loop, but uses the C-style syntax (except that parentheses around the initialization;condition;increment code are not required as they are in C/C++).

for initialization ; condition ; increment {
   statementblock;
}

And an example that does exactly the same thing as the FOR-IN loop above might look like this:

for var index = 1 ; index <= 10 ; index++ {
   print( "3 times \(index) equals \(index * 3)" );
}


DO WHILE/UNTIL loops

A FOR loop is best when you have a static range upon which the loop will iterate – either a bounded array, or a defined range expression.  When you need a statement block to execute indefinitely until a specific condition is satisfied, use one of the DO loop constructs.  Let’s start with the PowerBuilder options for these.

PowerBuilder

In PB, there are four variants of the DO loop, and the differences between them are very subtle.  They differ based on the terminating condition being TRUE or FALSE, and whether the condition is evaluated at the start or end of each iteration.

Syntax Description
DO UNTIL condition
    statement block
LOOP
This version evaluates the condition at the start of each iteration. If the condition is initially TRUE, the statement block will not execute.  Otherwise, the loop will iterate UNTIL the specified condition becomes TRUE.
DO
    statement block
LOOP UNTIL condition
This version evaluates the condition at the end of each iteration, so the statement block will execute at least once. The loop will iterate UNTIL the specified condition becomes TRUE.
DO WHILE condition
    statement block
LOOP
This version evaluates the condition at the start of each iteration.  If the condition is FALSE on the first iteration, the statement block will not execute.  Otherwise, the loop will iterate WHILE the condition remains TRUE.
DO
    statement block
LOOP WHILE condition
This version evaluates the condition at the end of each iteration, so the statement block will execute at least once. The loop will iterate WHILE the specified condition remains TRUE.

Swift

Swift only has two variants of the DO loop, a WHILE and a REPEAT statement.  The syntax for these is very straightforward:

Syntax Description
while condition {
    statementBlock
}
This version evaluates the condition at the start of each iteration. If the condition is initially FALSE, the statementBlock does not execute at all.  Otherwise, the loop iterates WHILE the condition remains TRUE.

This functions exactly the same as PB’s syntax #3 shown above.

repeat {
    statementBlock
} while condition
This version evaluates the condition at the end of each iteration. The statementBlock will be executed at least once, even if the condition is initially FALSE. The loop will iterate WHILE the specified condition remains TRUE.

This functions exactly the same as PB’s syntax #4 above.

Conclusion

I’ll cover the basics of the three primary Collection types in the next post.  In Swift, these are arrays, sets, and dictionaries.

-Paul-

Posted in Software, Swift | Tagged , , , | Comments Off on Swift for PowerBuilder Developers – Part III

Swift for PowerBuilder Developers – Part II

Introduction

This is the second of a series of posts that introduce the Swift programming language and the Xcode IDE to PowerBuilder developers.  Part 1 can be found here: Swift for PowerBuilder Developers: Part 1

In this installment, we’ll talk about the basic differences in the way code is organized in Swift vs. PowerBuilder, and we’ll look at specific examples of code blocks, IF/THEN/ELSE statements, and CASE vs. SWITCH statements.


Code Structures

Here’s a typical (although rather boring) block of Swift code, shown in an Xcode playground.

SwiftPB_1

Even if this is the first Swift example you’ve ever seen, there are some basic assumptions that you can make.  It uses curly braces to surround blocks of code, the keywords are in lowercase, function definitions have arguments and return values…  It’s just the details of the syntax that are different from PowerScript.

One basic difference is the basic structure of the way the IDE works with the code files.  Imagine this same code as a PowerBuilder NVO class.  This might represent code in the constructor event. or within some other public method definition.  You wouldn’t see the function definition for prepareGreeting() “nested” inside that event/method script, because the PowerBuilder IDE hides that code structure from you.  In this event’s code, you’d only have lines 3, 4, 5, and 21.  The function prepareGreeting() would be coded in a separate editor window, which you’d select from the function list dropdown.

Here’s a screen shot of that same code as a PowerBuilder NVO.  First, the constructor event script:

SwiftPB_2

Now, the function definition for the prepareGreeting() method.  To get there, I go to the Function List tab at the bottom, and pick the prepareGreeting() method from the list of functions.  You never see two function or event definitions in the same editor window.  Working in Swift and Xcode is like editing PowerBuilder code in “Edit Source” mode all the time.  Some people will like that, and some will hate it, but that’s what it is…

SwiftPB_3

Variable Scoping and Code Blocks

Swift

Look at the example Swift code in figure 1 again.  Note that there are two separate sets of variable declarations – the first three on lines 3, 4, & 5 occur “outside” of any specific code block, while the declaration for the variable prefix is inside the code block for the function prepareGreeting().  That’s not just for readability – it affects the scoping of the variables as well.

The three variables in the “outer” code section will be visible to any function defined within the entire Swift file.  If there was another function declaration below the last curly brace in the prepareGreeting() code block, that function would have access to those three variables as well.  There’s one copy of those for all defined methods within the file.

The variable prefix is defined inside the curly braces that make up the function body for prepareGreeting().  That variable will only exist in the context of that function.  I can’t reference prefix from outside that code block.  If there were another function declaration elsewhere in the file, it could have its own variable named prefix, and there wouldn’t be any conflict with the one defined inside prepareGreeting().

PowerBuilder

To compare that to PowerBuilder, think of them as instance vs. local variables.  The three variables on lines 3, 4, and 5 would be analogous to private or protected instance variables in a PB class.  All method and event scripts in the class would be able to reference them.  The variable prefix can be compared to a local variable, whose scope is only the code block in which it is defined.  You cannot reference the variable prefix from outside the code block in which it’s defined – that gets a compiler error.

NOTE:  Even though Swift and PowerBuilder both allow you to define local variables whose names match existing instance variables, it’s generally not a good practice…  The local copy of the variable would take precedence during the execution of the code block, and would not affect the value in the instance variable.

IF / THEN / ELSE statements

Swift

  • Swift does not require parentheses around the IF condition.
  • Swift does not use the THEN keyword.  The code block following the IF condition represents the THEN block of code.
  • Swift does not support an ELSEIF keyword.  If that’s the structure that’s needed, just code another IF statement following the ELSE keyword.
  • Swift does not require an ENDIF keyword.  It’s all about the code blocks and curly braces.

PowerBuilder

  • PB does not require parentheses around the IF condition, but it can be a good practice at times.
  • PB requires the THEN keyword (even if there’s no ELSE block).
  • PB requires an ENDIF keyword to terminate the entire IF statement block
  • PB supports the use of the ELSEIF keyword to string together consecutive logical branches.
  • There are no statement separators or designations of code blocks assigned to any of the clauses


CHOOSE CASE vs. SWITCH statements

Rather than construct long, convoluted IF/THEN/ELSE/ENDIF statements, both languages support the concept of a CASE statement, where the individual conditions and resulting code blocks are listed in order.  The first condition that evaluates to TRUE is executed, and the rest are skipped.

PowerBuilder

PB uses the CHOOSE CASE statement, and the syntax is pretty straightforward.  Note: this is not the case() datawindow expression function…

CHOOSE CASE testexpression
  CASE expressionlist
     statement block
  CASE expressionlist
     statement block
  CASE ELSE
     statement block
END CHOOSE

  • testexpression must evaluate to a single value
  • expressionlist can be a single value, a list of comma-separated values, a range separated with “TO” ( 1 TO 10 ), or a boolean expression using the keyword IS ( IS > 5 )
  • There can be any number of CASE blocks.  The first one to be satisfied will execute its statement block, and then drop out.
  • The CASE ELSE block is not required, but must be at the end of the list when used.
  • The set of values represented by all the CASEs do not have to be exhaustive – there’s no compiler error if you don’t address all possible values.

Swift

Swift uses the SWITCH statement.  There are several variants, but the basic format is very similar in structure to its PB equivalent.

switch testexpression  {
   case expressionlist:
      statement block
   case expressionlist:
      statement block
   default:
      statement block
}

  • testexpression (in this form of the statement) must evaluate to a single value.  (We’ll discuss tuples in a later installment…)
  • Curly braces around the entire set of case clauses
  • The individual statement blocks do NOT require curly braces around them.  You can add them for readability, but they’re not required.
  • The list of cases must be exhaustive – all possible values for testexpression must be addressed.  It’s a compiler error if you don’t…
  • The default: keyword is just like CASE ELSE in PB.  It’s the final entry in the list, and is the catch-all for any value not specifically addressed.
  • The expressionlist can be a single value, a list of comma-separated values, or a range of values.  There are two versions of the range operator.
    • Three dots (…) indicate an inclusive range.  1…10 will be true for values 1 through 10.
    • Two dots and a greater-than sign (..>) indicate a “half-open” range.  1..>10 will be true for values 1 through 9.

Conclusion

I think that’s enough for now.  Loop statements (For and While) deserve their own chapter, and that’s up next…

-Paul-

Posted in Software, Swift | Tagged , , , | 1 Comment

Swift for PowerBuilder Developers – Part I

Introduction

I’ve been a developer most of my career, and I’ve worked with a number of different programming languages.  I spent most of the 90’s and early 00’s working in PowerBuilder.  I still think it’s one of the cleanest, easiest to understand Object-Oriented programming environments available today.  (And, yes, it’s still available and has a bright future with Appeon.)

But with all of PowerBuilder’s strengths, it never really did mobile all that well, and it remains a proprietary Windows-only IDE to this day.  That rules it out for Mac or iOS development.  If you’re targeting those platforms, there’s really only one game in town, and it comes from Apple.  Their IDE is called Xcode, and (until recently), you programmed in a language called Objective-C.

In my opinion, Objective-C is just about the exact opposite of the PowerScript language.  It’s a variant of the C language (which I never used all that much), so I find it extremely difficult to read and even more challenging to learn.  But, if you wanted to write iOS apps, this was a hill you had to climb…

In 2014, Apple introduced the Swift programming language as a new option for development in Xcode, and it is a VAST improvement over Objective-C.  Simpler syntax rules, cleaner code structures, and much easier to read and understand.

So I thought I’d start a quick series of blog posts that compare and contrast Xcode and Swift with PowerBuilder and PowerScript.  There are still a great many PowerBuilder developers in the world (even more ex-PowerBuilder developers…), so I thought this would help a lot of people get going.  We’ll start with the basics, like variable and function declarations, and work our way up to the more complex topics like delegates, protocols, and closures.

Getting Started

Step 1 in working with Xcode and Swift is pretty straightforward:  get a Mac…  Xcode is not available on Windows or Linux.  You have to have a Mac, and you should be running the latest release of the OS/X operating system, El Capitan 10.11. Xcode is available for free from Apple, so you can get started writing code almost immediately.  However, if you plan on compiling your apps and actually deploying them to real devices (not emulators), you’ll need to sign up for an Apple Developer account, and that carries an annual subscription fee of $99.00 for an individual account.

PowerBuilder obviously requires a license from SAP (and soon, Appeon), but compiling and deploying applications has always been royalty-free.  PB apps don’t need to be digitally signed to be deployed onto other computers or devices, but Mac and iOS apps do.

Let’s start with some basics of the Swift language, and compare those to similar constructs in PowerScript.

Variable Declarations

Both Swift and PowerScript are considered “strongly-typed” languages, meaning that every variable must be of a specific type at design time.  When you write the line of code, you must give a variable a unique name and a defined type – either a standard datatype (Int, String, Double…), or a defined class or structure definition. For now, we’ll only be referring to “local” variables, even though both languages support the concept of instance, shared or class, and global variables.

PowerScript

A variable declaration in PowerScript looks like this:

{ constant } datatype { size } { precision } variablename { = value }

For example,

CONSTANT string l_myString = "some string"
  • Adding the optional keyword “constant” makes the variable read-only, and you MUST provide an initialization expression.  Any code that tries to alter the value of a variable defined as a CONSTANT will not even compile.
  • For most declarations, the datatype comes first.  This can be a standard system datatype, like “string” or “int” or “double”, or a known class or structure name.
  • size (optional) is for blob variable declarations, and denotes the max size of the blob in bytes.
  • precision (optional) is for decimals only, and denotes the number of places to the right of the decimal point.
  • variablename must be unique within the event or function script.
  • “= value” is an optional initialization value for the variable.  “value” must be of the same type as the declaration.

Swift

A variable declaration in Swift has a slightly different look, and is a lot more flexible, but most of the same concepts are there.

let | var variableName : type = expression

Notice the first choice you have to make – whether to use the keyword let or var.  One of these two keywords must be used.  If you want the variable to be read-only, use let.  If your code will change the value stored in the variable, use var.  So, let is Swift’s equivalent to PowerScript’s constant keyword, and var is just like the absence of the constant keyword – a normal mutable variable.

The variableName must also be unique within the .swift code file (which we’ll discuss in a future post, when we examine the structure of the code assets between the two environments).

A colon must be present to separate the variableName from its type.  You can read that colon as if it says “is of type”.

type can be any defined system type, class or structure definition, and the expression can be used to provide a default value during initialization.  But here’s a neat trick – if you provide an initialization expression, Swift will infer the datatype from it.  You can shorten the declaration and leave off the colon and the datatype.  For example,

let myVariable = "some string"

Swift will see that the initialization expression is a string, and will assign the String datatype to myVariable automatically.

Optional variables and null values

PowerScript

Here’s another difference between PowerScript and Swift.  In PowerScript, it’s perfectly fine to declare a variable and leave it uninitialized.  If it’s a standard datatype (int, string, double, etc…), PB will initialize the variable for you.  Numeric datatypes get set to 0, strings get set to the empty string, and dates contain ‘1900-01-01’.  That’s also true for all the individual fields defined within a structure class.  Non-Visual Object (or “NVO”) variables will be set to NULL until they’re instantiated with a CREATE statement.

Swift

Swift, on the other hand, requires that all variables be initialized to a non-null value before are they are used in the code.  Swift will not automatically initialize an integer variable to zero, or set a string variable to the empty string.  If your code references a variable that has not been initialized or specifically assigned a non-null value, you’ll get a compiler error.

But there are cases where a NULL value is the correct state of the variable!  For example, suppose you wrote an app that invoked a web service to retrieve the current temperature. If there’s no internet connection, the service can’t be called.  You don’t want to initialize the value of the variable to 0 degrees – that would indicate that it’s the dead of winter!  Data that’s “zero” and data that’s missing are two distinctly different states.

In this case, Swift has the concept of “optional” variables.  You have to decide, on a variable-by-variable basis, whether it needs to support the “uninitialized” state.  The syntax changes slightly for these too.  In the declaration, just add a question mark immediately after the datatype, as follows:

var temp : int?

The variable temp can now be referenced in the code without receiving a compiler error.  But there’s a twist…  Let’s say the variable temperature contained the value 85.  If you write a line of code that prints out the temperature like this:

print( "The temperature is currently \(temp) degrees.")

You’d expect to see “The temperature is currently 85 degrees” in the console.  However, what you’ll see is “The temperature is currently Optional(85) degrees”…   This is because the type of the variable temp is no longer an “int”, it’s an “optional int”.  To extract only the value and leave the “optional()” part off, you have to use a technique called “forced unwrapping”.  This is as simple as adding an exclamation point after the variable name in the code, as follows:

print( "The temperature is currently \(temp!) degrees.")

NOTE:  the “\(expression)” syntax above is a technique called string interpolation, and it’s a quick way to avoid having to do non-string to string data conversions in your code.  If I’d used string concatenation, I’d have had to convert the optional int temp to a String value.

Conclusion

In the next installment, we’ll discuss basic code constructs, like flow-of-control statements, code blocks, and function declarations.  In the meantime, if you have access to a Mac, I encourage you to play around with Xcode.  It has a really neat new feature called a Playground, which allows you to write Swift code “outside” the constructs and overhead of a full-blown application.  It’s exactly what it sounds like – a playground.  There’s instant feedback on compiler errors, you can write loops and see the result of code execution.

Posted in Mobility, Software, Swift | Tagged , , , | 2 Comments

2009 Napa Valley Marathon!

The Napa Valley Marathon was run on Sunday, March 1st, 2009.  26.2 miles of the most gorgeous countryside in the world.  It’s my favorite race because A) it runs the length of the Silverado Trail from Calistoga to Napa, and B) the male and female winners of the race (neither of which was me) win their weight in Napa Valley wine.

2009 Napa Valley marathon

2009 Napa Valley marathon

This is my third consecutive Napa marathon, and after two years of absolutely gorgeous conditions, we fell victim to the odds and it POURED the entire race.  I was completely soaked thru and thru by the first mile marker, and that contributed to a miserable finishing time of 4:43.  I stopped to wring out my socks on several occasions…  I have to keep telling myself that finishing a full marathon is still an accomplishment, and I’ll do better in the next one.


The highlight of the weekend was, of course, the wine tasting!  We had three separate private barrel tastings set up:

Del Dotto was first up on Saturday, and their new tasting room and caves out in St. Helena are just spectacular.  The entire experience was first-rate.  The 2006 Sangiovese was the star of the show for me.  It’s just sublime, with silky tannins and bright red fruits coming through.  Love their Pinot Noir as well, but it’s definitely not for lovers of a more “traditional” Pinot.  Darker ruby color, almost opaque, and very fruit-forward.  Felt more like a Syrah than a Pinot, but still delicious.

We also visited Bennett Lane, Clos Pegase, and Chateau Montelena (featured in the movie “Bottle Shock”) on Saturday. 

Sunday (for me) started at 4:45 am.  The starting gun went off in Calistoga at 7am, and I crossed the finish line just before 11:45, wet and tired, but satisfied that I’d given it all I had.  Proving that I bounce back like a man half my age, I had a glass of wine in my hand by 1pm!  


The Sunday wine-related festivities began with a barrel tasting at Reynolds Family winery in Oakville.  Their ’06 Russian River Pinot is gorgeous – Bing cherries and raspberries all day with a silky mouthfeel.  They have hand-labelled bottles that contain dried pressings from the wild mustard plants that fill the Valley.  Beautiful wines and a great experience.


The real highlight of the weekend came at our final private cave tour/barrel tasting at Chateau Boswell in St. Helena.  Boswell owns the property, and rents space in the caves to a relatively new label – Realm Cellars.  Boswell’s tasting room is not open to the public, so you have to call ahead for an appointment.    This session lasted nearly 4 hours, and we tasted just about everything that Realm and Chateau Boswell had to offer.  Everything was just spectacular, each one better than the next…  Scott from Realm took us first, and we started with their ’05 Beckstoffer/ToKalon Cab.  Wow.  It was absolutely perfect.  Realm is definitely one to keep on the radar.  We must have tasted from 8 or 9 different barrels, and everything just shone – drinkable now, but definitely with a backbone to age and develop.

Joshua Peeples from Chateau Boswell then led our group to their section of the caves, and we started with some of the whites in their Jacqueline label.  The Jacqueline Cuvee Blanc is a “Bordeaux Blanc”-style blend of Sauvignon Blanc and Semillon, and I absolutely loved it.  The Semillon gives this wine some real depth and a nice long finish.  The CB Chardonnay is a lush Burgundian-style chard.  It’s from the Wente clone, and is fermented for a full year on the lees with weekly battonnage.  This gives it great tropical fruit flavors, but a hazelnut/vanilla undertone that was fantastic without being overoaked.  I grabbed a half case of each.   Then we moved onto the Cabs, and they were equally as wonderful.  

We couldn’t have been treated better, and the wines were glorious.


Unfortunately, the rainy weather out in Napa kept us from enjoying the Valley to its fullest.  We’d wanted to take a side trip up into Healdsburg and Geyserville for some Pinot tastings, but we never made it.   The Healdsburg marathon is October 11th – maybe I’ll make it then!!

Salud!

-Paul-

Posted in Running, Wine | Tagged , , , , , | Comments Off on 2009 Napa Valley Marathon!

There’s a new Sheriff in town…

…and its name is SySAM.

Sybase Software Asset Management 2.0, to be more precise.  This is the new software licensing mechanism, based on FlexNET, that now governs a good portion of the Sybase product catalog.  It has been in use with ASE and PowerDesigner for some time, and will eventually cover IQ and SUP as well.  SySAM support was introduced into PowerBuilder as of 11.0, and it now governs all installed copies of PowerBuilder and InfoMaker.   Prior releases of PowerBuilder and PowerDesigner relied on the “honor system” of license enforcement.  To paraphrase a famous movie quote, “it’s not cheating unless you get caught, and if you’re not cheating, you’re not trying”.  Software companies that don’t enforce their licensing terms won’t be in business for long.

So like it or not, SySAM is here to stay…

Anyone that is considering an upgrade to 11.x from 10.x release or earlier will have to understand the ramifications of SySAM license management.  The good news is, it’s fairly simple once you understand the basics.  The Help file and product documentation cover the ins and outs of SySAM in exhaustive detail.   This post is just going to cover the basics.

Decide on a license model

There are two basic license models available with PowerBuilder’s implementation of SySAM.  These are “served” and “unserved”.   Let’s start by describing the unserved model first, since it’s easier to understand.

With an unserved model, each workstation receives an .LIC file that is generated specifically for that machine.  The Sybase Software Product Download Center website is where you go to create these files.  An .LIC file can be generated based on the MAC address of the network card or the serial number of the harddrive, so collect this information before you logon to the SPDC website.   When you install PowerBuilder, it will ask whether you’re using a Served or Unserved license, and if you answer “unserved”, it will prompt you for this .LIC file.   You can also apply the .LIC file after installation by going to Tools > Update License…

A served model means that a SySAM server process has been installed and is running somewhere on the network.  This process hosts the actual licenses and serves them up whenever a development workstation connects.   When using the SPDC for a served model, you are not prompted for individual MAC addresses or hard drive serial numbers – just the number of authorized licenses that you’ve purchased.  The SPDC generates a single .LIC file that gets loaded into the SySAM server.  When you install PB on the workstation and say “Served license”, you’re prompted for the IP address (or DNS name) of the server running SySAM.  As each workstation connects, they decrement the available license count until it is exhausted.

Now, one might infer that if you’re running a served model, and don’t have access to the SySAM server when starting PB, you’d be denied access…  Well, yes and no!  SySAM allows a “grace period” for each workstation, which allows you to run disconnected from SySAM for up to 30 days before PB won’t start.  Once you re-authenticate to the SySAM server, PB gets unlocked again.

It’s pretty clear that a served license model would benefit larger installations, because it saves someone the hassle of collecting all the MAC addresses of the development workstations.  Smaller shops will probably lean toward standalone “unserved” models, so that nobody has to tend to the SySAM server process.

Other random things to consider

Alternate Use licenses
SySAM allows you to generate a second, “alternate use” license for each purchased license of PB.  This can be used for a home workstation or a dedicated “build machine”.  The theory here is that a user should be allowed to work from home (or any other second machine) without requiring a second license to be purchased – you can’t be in two places at once!  And if you’ve dedicated a single machine for nothing but the deployment process (i.e., no active development work is being done on it), that’s perfectly acceptable for an alternate use license.

Citrix MetaFrame or Remote Desktop development
In this architecture, PB is installed on one single machine, and the developers connect to it and run Virtual sessions.  Development shops that use this architecture MUST use the served model.  The standalone unserved license model is not supported for Citrix or RDP users.  Now, this statement only applies to running the PowerBuilder IDE.  Deployed PB applications can still be run via Citrix or RDP without licensing implications.

Can I change from Served to Unserved (or vice-versa)??
Yes.  This is done at the SPDC website.  All you do is “check in” the existing license file and generate new ones with the new parameters.  However, if you’re doing a lot of checkins and generations, expect a call from your Sales Rep to find out the reasons why.  PowerBuilder does not support a “floating” license model, and a big volume of checkin/regenerate activity is a clear indication of someone trying to get away with something fishy…

The bottom line is this:  Sybase has a right, and in fact a duty, to enforce its licensing terms.  SySAM is an effective tool to do just that.  It may be a bit of a headache initially, but once it’s set up, you usually don’t have to bother with it again.  It really is in everyone’s best interests.

Enjoy!
-Paul- 

Posted in PowerBuilder, Software | Tagged , , , | Comments Off on There’s a new Sheriff in town…

Calling .NET Web Services from PB11.5

On the eve of this historic event – the Inauguration of Barack Obama as our 44th President – I thought it only fitting to provide a post that combined PowerBuilder with Politics… The web service in question serves up a random quote from our incomparable, (and soon to be unemployed) 43rd President, George W. Bush.

This entry will show you how easy it is to consume a web service using the .NET web services engine within PB11.5.

Step 1. Get yourself some WSDL
The language of SOAP-based web services is WSDL, or Web Services Descriptor Language. This highly arcane XML syntax contains the entire description of a web service, from the methods it exposes to the datatypes of the parameters it accepts and returns. Most web service engines will serve up the WSDL for their service by simply adding ?WSDL to the end of the URL. For example, we’ll be using the service at http://greg.froh.ca/fun/random_bushism/.
To see the WSDL, use this link: http://greg.froh.ca/fun/random-bushism/soap/?wsdl
(Save that last URL to your clipboard, you’ll need it in step 2 below…)

Step 2. Build a Web Services Proxy
PB11.5 ships with a sample Web Services application. I’ll add the Random Bushisms web service to that application, since it already has most of the app infrastructure in place. That workspace can be found in C:\Documents and Settings\All Users\Documents\Sybase\PowerBuilder 11.5\Code Examples\Web Services.

To create a web services proxy, select File * New. In the Project tab, select Web Service Proxy, as shown in image #1.

File - New dialog


The Web Services Proxy project object consists of two tabs – General and Web Service.

Let’s start with the General tab.
Deployment PBL: This is where PB will generate the Proxy class, so you’re selecting a PBL. The best practice (and the standard followed in the example workspace) is to create a PBL specifically for Proxy classes.
Proxy Name Prefix: This allows you to set your naming conventions for the proxy classes and their associated artifacts. I prefer “s” (for service) followed by a sequential number and an underscore. For the Bushism service, I used the prefix s21_


Proxy Object Web Services tab

Now on to the Web Service tab (image 2 above).

The top field is the WSDL location, and you have two choices. You can either paste in a URL to web services WSDL somewhere out on the internet, or you can click the button with the elipses to select a file on your local file system that has a .WSDL extension.  In our case, we’re using a public service, so paste in http://greg.froh.ca/fun/random_bushism/soap/?WSDL.  (I told you that you’d need it…)

Note: If this URL is unreachable or returns an error, I’ve included the .WSDL file in the PB115_webservices.zip file, which can be downloaded from http://blogs.sybase.com/phoran/wp-content/uploads/2009/03/pb115_webservices.zip.  PH

The next step is to click the Services… button.  This causes PB to introspect the WSDL file, and bring back this nice graphical treeview dialog containing the methods and structures contained in the WSDL.  Here’s what that dialog looks like:

Web Service structures and methods

Trust me – be thankful for this dialog.  You don’t want to have to read that WSDL syntax yourself…  What you’re doing in this dialog is selecting the service’s methods that you want to expose through the proxy. And, if those services return structures instead of simple datatypes as parameters, you’ll select the corresponding structures as well. This service is fairly simple – there’s one method: RandomBushismService, and one structure: RandomBushism.

Finally, in the WSDL Engine box, select the .NET engine, and provide a name for the .NET assembly DLL that will be generated. Click Save to save the project definition, and click Deploy to create the proxy. You should see two new entries in the Proxies PBL.

s21_randombushismservice:  This is the proxy itself.  You can open it and see the exposed method “getRandomBushism()”.

s21_randombushism:  This is an NVO with two public instance variables – Bushism and Context, which represents the structure returned from the web service call.

Step 3. Create a visual interface to display the results.
In the tabpages.pbl file, the ancestor class uo_ancestor contains all the plumbing to instantiate the service proxy. All you need to do is provide the invocation code, and then process the output. Since the service returns two strings – the quote itself, and the corresponding context in which it was said, I created a simple layout with two statictext controls.


Bushisms user object


In the clicked event of the Invoke button, add the following code:

s21_randombushismservice px_Service
s21_randombushism lstr_bushism

if instantiateService(px_Service, "s21_randombushismservice") then

TRY
   lstr_bushism = px_Service.getRandomBushism( )

   st_bushism.text = lstr_bushism.bushism
   st_context.text = lstr_bushism.context

CATCH (Throwable t)
   MessageBox("Invocation Error", t.GetMessage(), StopSign!)
END TRY


end if

It couldn’t be simpler. Instantiate the proxy class, invoke the method, use the results…
Save the object into the tabpages.PBL as uo_bushisms. The instantiateService() method is defined in the ancestor class uo_ancestor, so browse that at your discretion.

Step 4. Add the new service definition to the Service treeview.
The final step hooks this all together and allows the application to run with our changes. This isn’t really a requirement to get Web Services working from PB, it’s just to get them callable from this particular application. The main treeview is driven from a datawindow whose resultset is hard-coded into the .data attribute.

In the ws.pbl file, open the datawindow d_svclist.

If the Data pane is not visible, select View * Data, then go to the Data tab.

Insert a new row, and add the following column values (these can be copied and pasted from here):

svctype:     RPC
svcname:   Random Bushism
svcdesc:    Retrieve a random George Bush quotation
svcwsdl:    http://greg.froh.ca/fun/random-bushism/soap/?wsdl
svcsrc:       http://www.xmethods.com/ve2/ViewListing.po?key=uuid:83F65DE6-6676-676A-C8F3-213660CD696E

svcimpl:    Microsoft .NET
svcuo:        uo_bushisms
svcstatus: Y

Save the datawindow, then try running it!

Web Services sample application

I’ve uploaded the workspace with all these revisions intact into the PB115_webservices.zip file.

Enjoy!
-Paul-

Posted in PowerBuilder, Software | Tagged , , , | 34 Comments

Do you miss ObjectCycle?

Ah, the good old days of PowerBuilder 6.5…

It was a rock solid release, every consultant that could drop two commandbuttons on a window was making crazy money, and PowerBuilder shipped with it’s own Source Control package named ObjectCycle. It wasn’t a fancy integrated behemoth like Borland StarTeam or Rational ClearCase, but it was tightly integrated with PowerBuilder and its PBLs, which every other SCC package on the planet had trouble with… It did the job of basic version control for PowerBuilder, and the price was right.

ObjectCycle was EOL’d in 1999, but was still heavily used by companies that had frozen on PB 6.5 or 7.x. Then came PB8, and in that release Sybase completely revamped the SCC interface, utilizing the Microsoft SCC API. A new, basic SCC package called PBNative was developed for PB8, and is still shipping today. PBNative is extremely limited in scope, offering only Checkout/Checkin control and “Get Latest Version” operations. It stores only the most recent revision in its “repository” (which is just a folder on a shared LAN drive), and does not manage the version history of an object. A robust SCC package should store its repository in a full-featured DBMS, not the Windows filesystem… In my opinion, every development shop that is currently using PBNative (or doing nothing!) should be actively pursuing a real SCC provider…

There’s clearly a niche here. The PB world desperately needs a basic Version Management package with more functionality than PBNative, at an attractive price point, that is well-integrated with PowerBuilder.

As they say in the Bible – ask and ye shall receive.

Our good friends at E. Crane Computing, the creators of the now-legendary PowerGen product, are releasing a new SCC tool called PowerVCS. I spoke with E. Crane’s CEO, Phil Wallingford, and he gave me some general information about the new product, which is tentatively scheduled for limited beta here in Q1.

  • PowerVCS will have a pure “web” architecture, with a mySQL repository on the backend and a browser-based administration console on the front-end.
  • It will be offered in two modes: Private – where the PowerVCS server is installed and running inside your data center; and Hosted – where E. Crane will host the server-side components.
  • There will be a commandline interface, so batch-scripted build procedures can be developed.
  • Pricing is still being determined, but E. Crane is considering a monthly subscription model in the US$10 to $20 per month range.

I consider this to be a HUGE announcement, one that a lot of PB shops will absolutely benefit from. If you’ve ever used the PowerGen tool for automating your PB build process, you know that E. Crane puts out quality software, and is intimately familiar with the ins and outs of PowerBuilder development. (And if you haven’t used PowerGen, what are you waiting for???)

For more information on PowerVCS or E. Crane, drop them an e-mail at info@ecrane.com

Enjoy!
-Paul-

Posted in PowerBuilder, Software | Tagged , , , | Comments Off on Do you miss ObjectCycle?

More fun with PB’s new datawindow gradients – animated progress bars!

We all know that PB has the HProgressBar and VProgressBar controls, and they work exactly as advertised. You set the min/max position properties, the starting position, and the step increment, and then just call the StepIt() method to kick the progress bar into action. You get two basic styles – a “blocky” style and a “smooth” style. That’s it…

Well, I was goofing around on iTunes today, and was quite enamored with their nice animated progress bar. If you haven’t seen it, it’s got a nice angled gradient that moves along the bar from left to right, as the bar creeps forward. It looks like this:
iTunes progress bar

It’s just a nice GUI effect, and I wondered if I could implement that same effect in PowerBuilder… And I got pretty close! Here’s a screen shot showing the application in action.

TipsnTricks Progress Bar

There were a couple of challenges I had to overcome in this project: a) how to get the “progress bar” column to increment like an HProgressBar, and how to animate it with a sliding gradient image. Let’s tackle these one at a time.

First – what would I use to simulate a progress bar? I decided to create an external freeform datawindow, with two columns in the result set. The first column is the actual bar itself, which I called “progress_bar” (because I’m clever like that…). I placed this column into the detail band, and gave it an angled gradient from Silver to Gray. The first image below is the Design pane of the datawindow painter, showing the column itself (ignore that computed column for now, we’ll discuss that in a moment), and the second image is of the Background properties pane.

Progress Bar Design pane

Progress Bar Properties pane

I decided I would make the progress_bar column “grow” by dynamically changing its .Width property, starting at 0 and growing to it’s fully defined length 1% at a time in 100 increments. I also decided to do this with a datawindow expression, rather than coding Modify() calls from the PowerScript.
Which leads us to the second column in the result set – a hidden numeric value named “col_width”. In each iteration of the Timer event, I do a SetItem() of the value 1 to 100 into this column. By placing an expression that used that value as the “current percentage” of the original width, the datawindow rendering engine does all the heavy lifting! Now I just had to come up with the correct expression for the width property.

Since I was going to trigger 100 Timer events, and increment the progress_bar.width property by 1% of its “painted” length, my expression needed to determine what the original “painted” length of the column was. However, I can’t just use Describe( 'progress_bar.width'), because there’s an expression in there, separated from the original width value by the “~t” (tab) character. I had to monkey around with it to extract out the initial width value. That tricky part of the expression was placed into the aforementioned computed column – just for legibility.
long( mid( describe( 'progress_bar.width'), 2, (pos( describe( 'progress_bar.width'), '~t') - 1)))
That says, strip out the characters in the Width property between position 2 and the first ~t, and cast those into a Long value. The actual expression in the .Width property is then simply compute_1 * (col_width / 100.0), or “the original width of the column times the current iteration percentage. That gets our “progress_bar” incrementing right in step with the HProgressBar control!

Now let’s look at how I accomplished the gradient animation trick…
The first step is creating the angled gradient itself, and understanding how the new properties affect that gradient’s appearance. The Focus property of a background gradient changes the “center” of the gradient – in other words, the point at which there is 100% of the primary color. By choosing an gradient angled to about 45 degrees, and sliding the Focus property from 0 to 100, you can achieve that animated “sliding” effect that we’re after. The trick is to do it quickly, so it doesn’t appear jumpy. This relies on a little-used characteristic of the datawindow: it has it’s own internal Timer mechanism! By setting the “Timer interval” property on the General tab of the datawindow, any expression that uses the Now() function automatically gets recalculated at that interval.

I set the Timer Interval property to 10 milliseconds (1/100th of a second), and then wrote the following expression into the Focus property of the “progress_bar” background gradient: integer( string( Now(), 'ff')). That takes the current time, gets the current 100th of a second from it, and makes an integer out of that. This causes the Focus of the gradient to move smoothly from the left side of the column, and then start over when it reaches the end.

As I said at the start, this doesn’t exactly duplicate the iTunes effect, but it does get close. The iTunes progress bar has more than one Focus point, i.e., it’s more heavily striped, whereas the datawindow only gets one Focus point, but it’s still a neat effect!

Download the TipsnTricks.zip file to see the code for this. It’s the uo_gradient_progressbar object. Let me know your thoughts on it.

Enjoy!
-Paul-

Posted in PowerBuilder, Software | Tagged , , , | Comments Off on More fun with PB’s new datawindow gradients – animated progress bars!

Datawindows: They’re not just for DATA anymore!!!

OK, we all know that the “selling point” for PowerBuilder’s datawindow object is the ease with which it can retrieve data from a relational database, abstract out the complexities of binding that data to visual controls in the UI layer, and handle all the tedium of data validation and transaction management.

YAWN!!!  
Been there, done that, got the t-shirt! (Trust me, I have a LOT of PowerBuilder t-shirts…)  

In this posting, let’s take a look at a new feature of PB 11.5 that will let you use datawindows in ways you probably never thought of. And they have NOTHING whatsoever to do with data!

I’m sure your users would love to have a nice, subtle gradient (or even an image of your company logo?) in the background of your application’s windows and tabpages. You’ve been stuck with a solid background forever. Well, with PB 11.5, Sybase introduced support for gradients and transparency!
Problem solved, right?!? Not so fast, cowboy…

The new gradient capabilities are limited to one object – the datawindow. You can’t set a gradient in the background of a window or custom visual user objects (yet). This posting is going to show you how to accomplish that same effect using a datawindow!

Step 1. Create a freeform, external datawindow.
Since the data doesn’t matter, create this as an external dw with a single string column. You won’t have to bother with an InsertRow() or SetItemXXX(), so even the name of the column is immaterial. In the TipsnTrick sample app (which can be downloaded from the Box.net widget on the front page of this blog.) I called this datawindow “d_gradient_only”.

Step 2. Set the gradient properties in the datawindow background
I chose a subtle angled gradient that transitions from Teal in the upper left-hand corner, to Silver in the lower right.  The figure below shows the Background properties panel for that datawindow. Mine are just examples – choose your own color schemes and brush types.

Background properties panel

The Angle property setting only pertains to the AngleGradient brush mode, and it controls the direction of the transition from color #1 to color #2. I have that set at about 20, which causes the transition to go from top-left to bottom-right. Experiment with the various gradient settings to get the exact look that you want.

Step 3: Drop a datawindow control on your window or user object.
This is easy PowerBuilder 101 stuff. You place a datawindow control on the surface of whatever you’re using, and move it to the top left corner. You don’t need to stretch it to fill the entire parent, since we’ll be adding resize logic in step 4. (For you OOP noobs, making these changes to an ancestor class for the window or user_object would be a good design choice here).
In the sample app, I created a user object named uo_gradient_background, and the dw control is named “dw_grad”.

Step 4: Add resize logic so that the datawindow always fills the parent.
Programming note: Window objects come with a “resize” event already defined, but User Objects do not, so if you’re using a custom visual user object, you have to define a prototype for the resize event. If you open the uo_gradient_background object, you’ll see that I have the “resize” event mapped to the pbm_size system event.

Place this code in that event:
setRedraw( FALSE )
dw_grad.resize( newWidth, newHeight )
setRedraw( TRUE )

I also placed one line of code in the window Resize event which resizes the Tab control.
tab_1.resize( newWidth, newHeight )

Now you have a datawindow as the background of the user object (or window, if you went that way), and whenever the parent container is resized, the datawindow always fills the available space. Consider this the actual background of the parent, and drop whatever actual UI controls your users will see right on top of the datawindow. The figure below shows the effect it creates:

gradient

Enjoy! And Happy Holidays!
-Paul-

Posted in PowerBuilder, Software | Tagged , , , | Comments Off on Datawindows: They’re not just for DATA anymore!!!